


![Cypress Best Practices for Test Automation [A Tester’s Guide]](https://cdn.hashnode.com/res/hashnode/image/upload/v1658822465583/D-nFG6_0e.png?w=1600&h=840&fit=crop&crop=entropy&auto=compress,format&format=webp)
Cypress is an automation tool that runs tests on a browser. It is mainly used for front end test automation.
As a test automation engineer, there are some best practices that need to be followed in a Cypress project that makes the code more efficient, reusable, readable and maintainable.
In this blog, we are going to discuss eight best practices that a QA Engineer should know while using Cypress as their primary automated testing tool.
- Independent it() blocks
- Using dynamic wait
- Using hooks
- Adding BaseUrl in config file
- Using “data-cy” attribute for identifying locators
- Defining “scripts” in package.json
- Using comments
- Using clear() command
8 Cypress Best Practices You Need to Know
1. Independent it() blocks
We write the script for a test case in it() block. We write multiple it() blocks in a spec file inside the “describe” block.
The important coding standard that we have to follow here is that the code written in one it() block should not be dependent on another.
The reason for this way of coding is that when we run a spec file with multiple it() blocks(Example: 10 test cases), if one it() block fails the remaining it() blocks won’t fail since there is no dependency between them.
On the other hand if one it() block is dependent on another it will make the remaining test cases fail.
2. Using dynamic wait
There are some developers who use the cy.wait(timeout) command mainly after they write code for any page actions like visiting a url, save, update or delete action in order to wait for the API to get triggered and get results.
Example
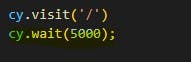
When we run the above code the script will wait for 5 seconds even though the page is loaded in 2 or 3 seconds.
It is a bad practice to write code using this static wait command cy.wait(timeout) in these scenarios.
A better solution is to write dynamic wait code using cy.intercept().
Here is an example of using intercept.
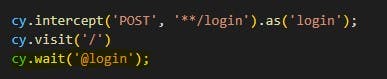
In the above code, we use cy.wait() to wait for the particular API “login” to be called.
Once we get the result of this API it starts executing the next code.
The main advantage of writing dynamic code is that it saves the waiting time and executes the script quickly.
3. Using hooks
Consider a scenario where we have a spec file and we have 10 test cases in that spec file and for each and every test case we need to write 2-3 lines of code that is common to all test cases at the start of the test case.
In this scenario it is not a good practice to add the same repetitive lines of code at the start of each and every it() block.
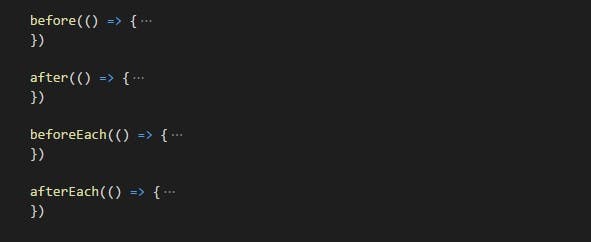
The solution is that we need to write the code in beforeEach() hook.
The beforeEach() hook will automatically execute the code written in it before each and every test case gets executed.
Same way we can use afterEach() hook to write common code to be executed after each and every test case got executed.
Also we can use before() hook to write common code to be executed before all test cases got executed in a spec file.
We can use after() hook to write common code to be executed after all test cases get executed in a spec file.
4. Adding BaseUrl in config file
In most of the applications the base url of the application is the login page.
In all the spec files we need to use the login url as the base url for login and perform other test activities.
Some developers hard code the base url using cy.visit() in the before() block of each spec file as shown in the image below:

This is a wrong practice because when we run the spec file in cypress runner, it will initially load the localhost url and then reload the url we gave in the cy.visit().
This is time consuming and looks awkward.
To overcome this issue we can write the base url in the cypress.json file as shown below.
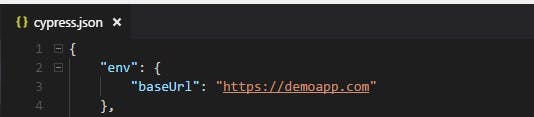
We can call this url in our before() block as shown below:

When we write in this manner, cypress identifies the url before the spec file gets executed and will provide the value we defined in “baseUrl” for the spec file.
This allows the base url to get loaded directly without loading localhost url.
5. Using “data-cy” attribute for identifying locators
To identify a locator, some of them give the path of that locator using ‘id’ or ‘class’ attribute as mentioned in the image below:

Defining locators in this way will make the code to fail in future when the class name or ‘id’ value is changed by the developer for the particular locator.
To overcome this issue we should use an attribute named “data-cy” which is an attribute defined for QA use only and developers won’t modify the value of this attribute.
We can use this attribute to define the locators as shown in the image below:

6. Defining “scripts” in package.json
We usually run the cypress commands in the terminal of Visual Studio code.
For example we will use the “cypress open” command to open the cypress runner.
The corresponding code we use in the terminal is “npm run cypress open”.
It is a best practice to write this “cypress open” command inside “scripts” JSON of package.json file as shown below.

The corresponding code we use in the terminal is “npm run cy:open”
All the commands we use to run in the terminal we can define inside the “scripts” JSON with an user defined name.
The main advantage of defining in this manner is that when we need to run lengthy commands in the terminal, we can define the command in “scripts” JSON and call the user defined name to run in the terminal.
7. Using comments
It is a good practice to put comments before each block of code we write inside it() block so that when others view the code we wrote, it will be easy for them to understand functionality that is being automated in the script.
8. Using clear() command
We use cy.get() command to get the locator for a text box and use type() command to enter values in the text box.

It is a good practice to use the “clear()” command before we use the “type()” command in this scenario.
The “clear()” command will clear the values that are already present in the text box.
So when we type the value in the text box after clearing the value it will enter the correct value we mentioned in the script.
If we don’t use the “clear()” command there is a possibility that the already existing value and the value we gave in the script get combined and entered in the text box.
The above code after using “clear()” looks like this:

Do You Need Help With Your Testing Requirements?
Are you looking for a reliable partner to handle automated testing requirements?
Our certified and skilled test engineers at Perfomatix can help you in automating the process of reviewing and validating your software product.
Drop us a note to set up a meeting with our test automation team.